| The
vehicle is a 1/72-scale all cast resin Italian armored car. The package
describes the vehicle as the Tripoli Type implying to me it was a
variant, or style, serving in North Africa: Tripolitania. My references
state that it was developed in late 1918 and variants served into
WW2.
In the half dozen historical photos I have found of this armored car
there are significant variation in the vehicle apparently reflecting
over 20-years of use and upgrading. For example, in North Africa several
of these had the armored box mounted on a Fiat Spa 38R truck and a
12.7-mm Safat machine gun in the turret with the top removed.
Kit Parts
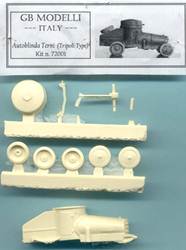
- The
model consists of 10 light amber colored, cast resin parts, a solid
hull casting with doors and hatches closed, five roadwheels (one
is a spare wheel, actually a set of paired wheels), a turret, water
cooled machine gun, and front and rear axles and drive train.
- Casting
looks smooth and pretty good; no air bubbles or warped parts. Clean-up
of the parts looks easy with a small saw and a sanding stick.
- The
kit comes in a small plastic bag with the label at the top of the
above photo. The label has a small black & white photo of the
right side of the armored car. The vehicle has a look similar to
other armored cars of the 1920’s and 1930’s. The cylindrical
body and engine areas are unique though.
- The
roadwheels appear to have solid rubber tires with little or no tread.
The rear wheels are doubled, side by side.
Kit
Instructions
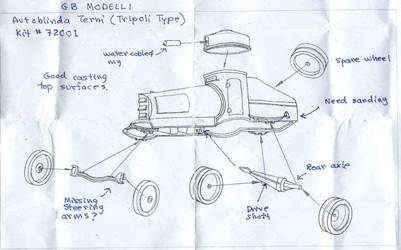
- The
assembly instructions are the standard exploded-view style with
no written instructions; the assembly is so simple I don’t
think written instructions are needed. (My personal notes on the
kit are handwritten in blue.)
- I
feel a little sanding is needed on the underside of the rear. Steering
arms for the front wheels should be easy to duplicate
Model
Assembly
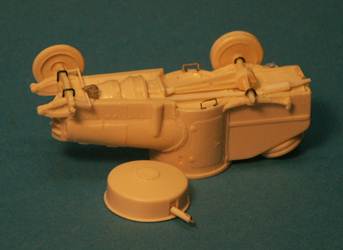
- I
just cannot help adding extra detail to a model. Based on my knowledge
of motor vehicles I took the liberty of adding some details such
as an exhaust pipe, steering arms and brackets to the suspension.
This is pure guesswork and I do not recommend that you copy this
model for details.
- Based
on one of the few historical photos I have found, a step has been
added below the doors, made from brass wire.
- One
of the rear axles was broken so I had to add an extension made from
a styrene rod. The mounting holes on the wheels were also opened
up more with a drill.
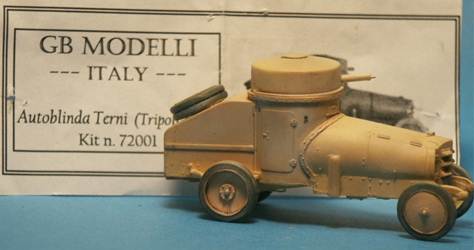
Rivet
and panel lines look good. A small error I did not correct is at
the back of the turret base, there is a small section of a protruding
rim that was removed when I cut the turret from the pore plug. I
replace the broken small machine gun barrel on its water-cooled
jacket.
Painting
& Markings
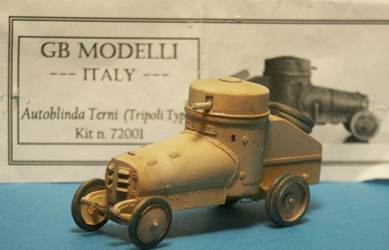
- No
decals markings are included nor painting instructions. In North
Africa I understand that this armored car would be painted a flat
light tan color. If serving in Europe during the 1930’s and
1940’s I believe a flat gray-green color would be appropriate.
The tires should be dark gray color (not black when taking scale-effect
into consideration).
- The
model was painted with light tan Model Master Acrylic paint for
a car serving in Libya, then brown and black point washes used and
the top surfaces lightly sprayed with a lighter tan color to represent
fading by the sun. The tires were painted Poly-S Grimy Black color
to represent the solid rubber.
- Water
slide decal license plates from a DOC
Models kit were applied fore and aft over a clear gloss coat.
Conclusions
- The
kit is well done and I recommend it for beginners to advanced modelers.
Assembly was quick and simple, but be careful to glue parts on straight
and in the right locations.
- Using
reference photos you may wish to detail it with grab handles, decal
markings from other Italian AFV kits, and other items.
References
I found nothing in my Italian armor books on this vehicle but was
able to find articles and photos doing an online web search.
Thanks to Georgio Briga (GB Modelli)
for the review sample.
Briga
(GB Modelli) products are available at

|