|
Preliminary remark: As of writing, Italeri (which currently owns the Esci molds) just released the Pz.Kpfw I Ausf.B (Italeri kit 7042 - Esci kit 8024). Some of the remarks in this review are also applicable to that kit, and to Esci kit 8046 for the Panzerjäger I Ausf B. It is quite likely that, in the near future, Italeri will be marketing all three kits. This review is meant as an addendum to a previous review of this kit. 1. Packaging Side opening cardboard box.
2. Type of kit Classical injection plastic with link and length tracks. I am not sure whether this kit has been released with rubber tracks as for some Esci releases. Decals provided.
3. Quality of casting The casting quality is very good, with no warpage, flash or all too annoying ejector marks.
4. Accuracy This was one of Esci's better releases. It had hatches that could be positioned open, and had hard plastic tracks . Still the latter were bigger than the real thing, making for fewer tracks links, fewer teeth on the drive sprocket and less spacing between the tracks and the fenders. The open hatches were nice, but there was nothing inside to be seen, and worse, the hull was covered by a styrene plate running the length of the hull, straight through the fighting compartment.
Comparing with drawings by Hubert Cance in Steelmasters [4], there are some dimensional deficiencies, notably in the area of the engine compartment. The latter is 3mm short, and this is quite obvious for a model of this size. Incidentally, the engine deck is the same size as that of the Ausf. A, but with details from the Ausf. B. One of the causes for this is a rear plate that has received too much inclination. This is almost impossible to correct. The overall length (over the fenders) is correct though. When putting the plan over the model, we can also see that the superstructure is too big (front end too much forward), and with the cover for the exhaust just behind it being a tad too long, it aggravates the size problem of the engine deck. The longitudinal inspection hatches are also much too short.
The transition between the superstructure and the engine compartment shows some angles that shouldn't be there, which is nicely shown by Doug Chaltry [11,12]. This is due to a combination of the above mentioned errors and the sides of the engine compartment being too vertical. It is shown correctly on the box art though. This can be corrected with some filing and puttying, as I did. Also note that the manual would have you install the tracks backwards. (Incidentally quite a number of manufacturers want you to do that). While [11] tells you to remove the towing hooks on the glacis, I found them on a number of pictures, although somewhat smaller. What is supposed to represent lifting hooks on the glacis (half ovals) are post war museum additions.
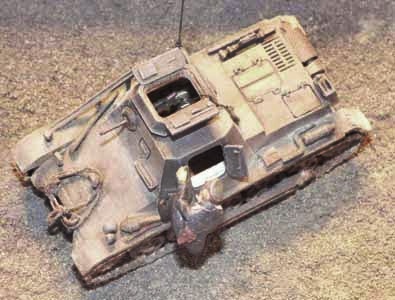
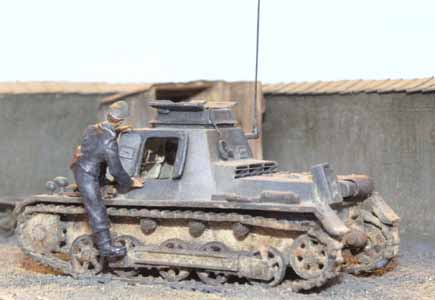
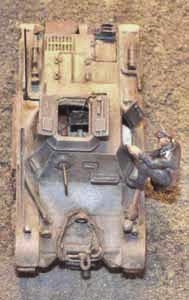
I also added / changed the following: - Extra armor on the superstructure. I am not sure if this always came with extra armor on the glacis. Interpreting available pictures, I only installed the former. This surpasses the sides of the superstructure slightly. I needed to cut out openings for the MG and visors. Some bolts were added and the driver's visor opened up. - The visor on the right side of the superstructure is positioned too low. See the box art for the correct position. - I haven't found pictures of vehicles with visors on the rear oblique sides, so I dropped them. - I added the interior - The exhaust behind the superstructure was thinned down, and detail added (grating). I've never seen the supplementary cover Esci provides. - I raised the upper hull a bit by adding a plastic strip between it and the lower hull, to give the tracks some extra spacing (otherwise they touch the fenders). It also solves the problem with the rear plate being somewhat too high to fit. - I filled the hole for the antenna of the Pz.Kpfw. I on the front part of the superstructure. - All opened hatches were thinned and detail added, like a vision slit in the front side door. - The exhaust was thinned down and a wire mesh added. - A groove was added to the antenna tray and a third support added. - A thin spacer was added below the commander's copula. Otherwise it is somewhat low in profile. - I added a rear convoy light. - A tow cable was made from copper wire. The one in the kit is poor. - Various accessories were added from the spares box: jack, shovel, wooden block, extinguisher.
I left some small errors for what they were: - the axles of the return rollers should be more prominent - the spokes of the roadwheels ought to be more rounded. - the first shock absorber is a bit too vertical
5. The interior
While the kit allows you to open up all hatches, there is nothing inside. I cut open the hull, and added all stuff from scratch based on available pictures [2]. The radios came from Airwaves (set SC72-81), originally meant to be put in aircraft. The dials come from Reheat Models (yep, also for aircraft).
6. Version The Esci model depicts a 2. Serie kl.Bef.Pz. Wg. Tp. as used during the African campaign: • armored strip on the sides • higher commander's copula • vents and raised covers on the engine deck
I transformed my model into a 3. Serie (see pictures). This is mainly a matter of removing the armored strip and removing the tropical provisions.
7. Instruction sheet: Apart from the reverse installation of the tracks, this is typical (good) Esci quality.
8. Decals and painting options: There are multiple decal options, but only one painting scheme. Decals are nice, but as mine were old they had yellowed too much to be usable.
9. Conclusion:
This model has some potential, and at the time of its first release didn't need to blush. It all depends if you are willing to wait for some other company to come up with a better proposal. As I was writing this, I picked up "rumors" that various companies were planning update sets to go with Italeri's re-release. 10. References [1] Panzerkampfwagen
I, Kleintractor to Ausf B, T.L. Jentz, Panzer Tracts 1-1, Darlington |


