Italeri

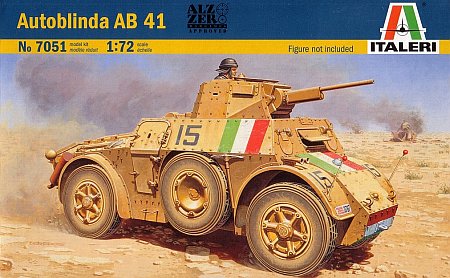
Autoblinda AB 41
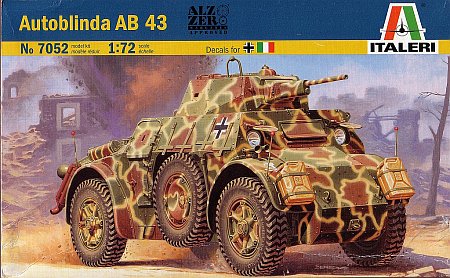
Autoblinda AB 43

Kit #: 7051 & 7052 Review by - Al Magnus

Kit Contents:

The parts are molded in a hard butterscotch coloured plastic. Quality is quite good with little flash and only minor seam lines to deal with. Also included is an instruction sheet outlining 11 steps to follow for construction and a small decal sheet of decals.

For the AB 41 (kit no. 7051) there are 68 parts and for the AB 43 (kit no. 7052) there are 71 parts. The sprues for both kits are almost identical with the major differences coming in the tires, muffler and turret. They share common body parts, wheel rims and most of the ancillary parts like the main gun, jerry cans & pioneer tools.

Common Construction Points:

For both kits, construction pretty much followed the steps outlined in the instructions. Fit was excellent throughout with only a few major issues to be addressed. Injector pin marks are well placed for the most part. There is a set inside the wheel wells that are most difficult to get at. There is also a set of marks that sit proud of the frame and make adding the side panels a bit trying if they are not removed.

There are two spacers (part 49A) to go between the hull halves (parts 22A & 23A). I found that they actually spread the hull halves too far apart making the joining of the hull parts more difficult. So these were discarded and I built up the hull without them.

The rear sway bar is a separate piece but I can't figure out why the same was not done for the front sway bar.
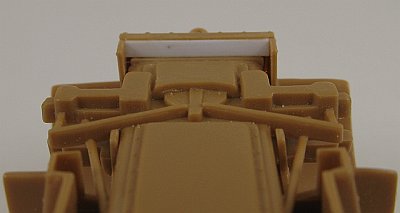
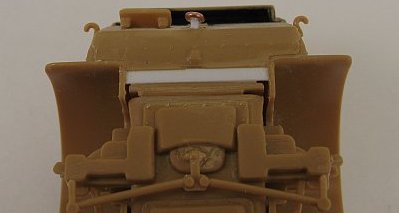
After placing the body on the frame I discovered there were gaps between the body and frame at each end. These were covered over with some sheet plastic.
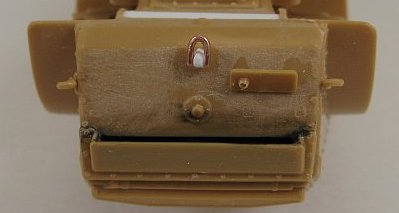
I replaced the molded on rear tow hook with a scratch built item made from some plastic for the mount and a loop made from some copper wire. I drilled out the opening for the exhaust pipe, turret gun barrel and the horns. The foot step rungs (part 13A) located below the rear doors just needed some thinning to look more acceptable.

In my opinion Italeri are currently in the fore with regards to out of the box decals, and these are a prime example as to why I believe this, with all images being in register, opaque and very thin. I used the kit decals for both builds and they proved to be excellent as expected. A few applications with some decal solvent such as Microsol got them to conform nicely to the model while their opacity blocked any chance of bleed through of the colours underneath.


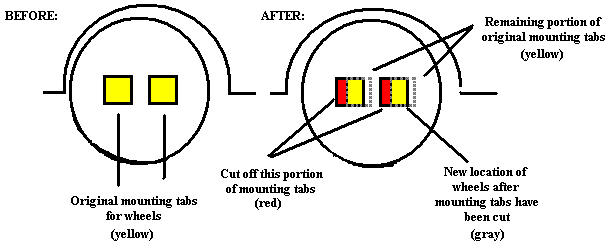
The only other major issue appeared during a test fit of the rear wheels. Here I discovered a problem concerning their location in the rear wheel well - they almost touched the front of the rear fenders. The cause was traced to the wheel hubs which have a pair of square shaped locators that are meant to fit onto a pair of square locating stubs on the end of the axles. This allows for a very sure fit when attaching the wheels but they also place the wheels too far forward in the well. My fix was to trim about half of the plastic from the front of the locating stubs on the axles. Doing this allowed me to shift the wheels about a millimetre or so to the aft, thus moving the wheels more to the middle of the wheel well. Not the most elegant solution but one that works (hopefully the crude diagram to the left provides a better idea of what I did to correct the wheels).

Autoblinda AB 41, kit no. 7051

Decals and painting guide are for four options:

  1. Vehicle no. 15, plate number Polizia Africa Italiana 0767, of the Italian African Police Force, Tunisia 1943, in overall sand camouflage and displaying colourful markings complete with a plethora of Italian tri-coloured flags (this is the option on the box top art work).
  2. An AB-41, plate number RO ETO 166B, of an unidentified unit with the Italian Army, 1942 in overall sand camouflage.
  3. A beute AB-41 (Pz.Sp.Wg.AB 41 201(i)), 162 Infantry Division, Italy 1944 in a three colour camouflage of sand/dark brown/olive green splotches.
  4. An AB-41, plate number RO ETO 482B, of the 15o Rgt. Cavalleggeri di Lodi (R.E.C.O.), Pinerolo, Italy 1942 in a three colour camouflage of sand/dark brown/olive green.

The kit's tires are very poor. They have absolutely no tread pattern and have more of a resemblance to drag racing slicks than anything else. As far as I know they are supposed to represent a set of sand tires but web photos of AB-41s with these tires, and even the box top art work, show some tread pattern which for some reason Italeri chose not to add.

I dearly wanted to model the first marking option listed above, which in my opinion was the most colourful of the four, but was unsure as to whether or not the tires in the kit were valid for this option as I had seen AB-41s with both tire styles. Additionally, the lack of tread pattern was totally unacceptable so I started a search hoping to find an AB-41 featured in the marking guide using the aggressive treaded tires. Failing that I also hoped to find a doable marking option other than what the kit offered. After a couple of days cruising Google search I discovered a picture on the web of a sister vehicle to marking option 1 (vehicle number 14, see picture to the left) which sported a set of the aggressively treaded tires, plus I found some instructions for the Tamiya 1/35 scale AB-41 which offered marking option 1 and the aggressive tread tires as well. Confident that I was now able to model my desired vehicle I set about replacing the kit tires and decided that the easiest path was through the purchase of Italeri's AB-43 kit (number 7052) which contains the tires that I needed. I could have bought some resin aftermarket tires and wheels but figured that I would get near the same tire quality from the Italeri AB-43 kit plus the added bonus of extra items for the parts box such as a pair of shovels, another pick axe, more jerry cans, tow hooks, plus an extra set of their excellent decals, all for close to the same price as resin replacements.

I left off part 45A because it was going to go under a set of extra jerry cans that I added to the front glacis. The jerry cans came from the spares box, and the frame was fashioned from some left over brass strip. I also replaced the rather thick fender markers on the front fenders with a new pair manufactured from some guitar wire with the balls at the top fashioned from super glue and baking soda. I didn't bother adding any markers to the rear fenders as most AB-41 pictures I found on the web didn't have them.


Autoblinda AB 43, kit no. 7052

Decals and painting guide cover four options:

  1. An overall dark red/burgundy AB-43 of the Polizia di Stato (State Police), Nucleo Celere di Pubblica Sicurezza, Rome, Italy in the 1950's.
  2. A beute AB-43 (Pz.Sp.Wg.AB 43 203(i)), 4 FallschirmJäger Division, Florence, Italy, August 1944 in a three colour camouflage of sand/dark brown/olive green splotches.
  3. A beute AB-43 (Pz.Sp.Wg.AB 43 203(i)), Stab/PanzerJäger Abt. 165, 65 Infantry Division, Italy 1945 in a three colour camouflage of sand/dark brown/olive green splotches.

The tires for this kit are much improved over what is in the AB 41 kit. They have acceptable tread pattern. Those wishing to have the ultimate tires can go for one of the aftermarket replacement tire sets (though I feel these to be quite expensive).

The most intriguing marking options are for the German beute vehicles, which in my opinion are the most colourful of the lot, but the complicated camouflage didn't endear itself to me. I have to give kudos to any and all that attempt to paint these schemes as I don't have the nerves for it. So once again I embarked on a search to find something simpler regarding markings. Failing that my fall back option was to do the Police version. After much searching through the web and my references I settled upon building my AB-43 based on the picture to the left found in [1], another German beute AB-43 that appears to be in Italian sand or German yellow camouflage, an added bin to the rear of the turret and no fender width markers. Unfortunately I could not locate any photos of the vehicle's front to see if there were any other modifications.

Because none could be seen from the vantage of the reference photo, I left off all the jerry cans (part 34) and I didn't bother adding any width markers to the front or rear fenders.

The bin attached to the turret was scratch built.


The kit muffler has only two lobes instead of the proper four lobes, so it needs to have two creases scribed into the sides to add the additional lobes.

Conclusion:

All in all both of these are excellent kits and I can recommend them highly. They are nicely detailed straight from the box and an overall relaxing kit that can be assembled with little fuss and frustration.

References:

[1] Beutepanzer unterm Balkenkreuz Panzerspahwagen und Gepanzerte Radfahrzeug: Waffen Arsenal 146, Werner Regenberg, Podzun Pallas Verlag, Wölfersheim-Berstadt 1994
ISBN: 3-7909-0494-5
[2] Wikipedia (AB 41)
[3] Encyclopedia of German Tanks of World War Two Revised Edition, Peter Chamberlin & Hilary Doyle, Arms and Armour Press, London 1993 ISBN: 1-85409-214-6
[4] Warwheels.net (AB 41)
[5] Warwheels.net (AB 43)
[6] Warwheels.net (AB 43 walkaround)


Review samples purchased by the author.

Back to Italeri Kit List Back to Construction Reviews

Article Last Updated: 14 September 2013

Back to Home Page