Please
consider this a Part 2, complementary to the In
The Box Preview.
This model kit
is intended for the wargaming market, not for display modelers, so
it cannot necessarily be judged under the same criteria. Still we
should expect some degree of historical accuracy despite simplification
of construction.
There are three
kits included in the box; for this construction review I assembled
two of the kits side by side, one mostly straight out of the box and
the second with some homebuilt details and extra parts stolen from
some other Sherman kits.
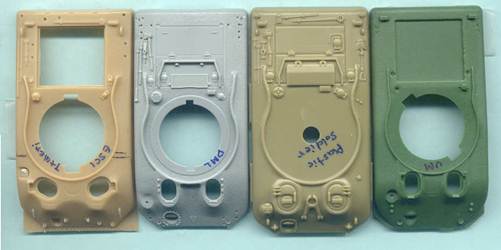
A friend commented that this kit looked like a “caricaturization”
of an M4 tank. That got me thinking about reviewing it a little deeper.
Second from right is the Plastic Soldier Co. M4A1(75) kit next to
the comparable UM kit and Dragon kits. This is also a good perspective
to see the overly large driver's hatches on the PSC kit, which in
turn distorts the angle of the glacis and leaves no room for the periscopes
and applique armor located in front of the hatches. The hull shape
looks good though.
_t.jpg)
This is a scale drawing from a US Army publication I use to help determine
the kit’s scale. I convert the inches to millimeters of a full
size 1/1 scale M4A1, then divide these values by 72 to determine the
measurements of a 1/72-scale M4A1. To find the scale of our model,
divide the measurement of the real Sherman tank by the measurement
of the model.
The PSC hull in
the photo above of the hull comparison appears several millimeters
longer and wider than the other M4A1 hulls. Based on two measurements
of my completed PSC kit my math makes this out to a 1/68 scale
Sherman model, not 1/72 scale. Maybe this is also why the driver's
hatches appear too big?
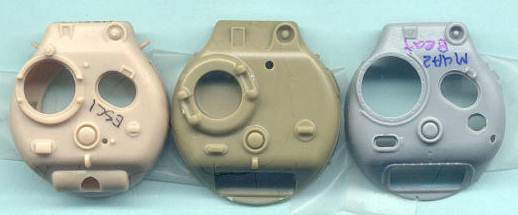
Here is the PSC turret in the center, in between a DML and an ESCI
turret. Like the Plastic Soldier Company hull the turret appears larger
than the other two manufacturer's turrets; the overall shape looks
good though. The PSC and DML cupolas are separate and can be modeled
rotated so the hatched open front to back or to the sides like the
real cupola. The PSC turret represents the initial style of M4(75)
turret with no loader’s hatch, no smoke discharger penetration
and with a low turret bustle.
KIT ASSEMBLY
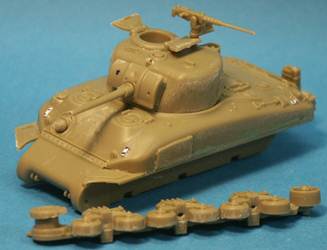
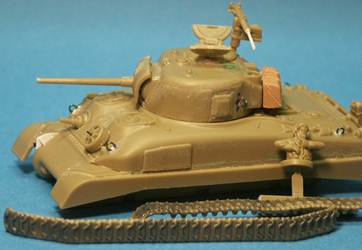
Here is the Plastic Soldier Company M4A1 kit assembled largely as
intended. The hull has a nice shape and looks accurate for a cast
hull Sherman except for the driver's hatches and glacis, which I discussed
in the kit preview
Part 1. The only significant detailing I did on this one is to
thin the fenders and to cut off the lifting rings and replace them
with thick copper wire. I have also scraped off the molded-on gun
cradle that was located between the driver's hatches. In front of
the tank is the two-piece suspension.
Fit of the parts
was very nice. The PSC styrene plastic was rather soft which is nice
for trimming parts, but allows thin parts, like the 50-cal. machine
gun barrel to easily break. The turret's pistol port is poorly shaped
so I trimmed and sanded it to represent a pistol-port welded shut.
The M34A1 rotor shield (gun mantlet) needed a gun sight drilled.
A problem I found was that the AA mg on the turret was mounted on
the turret roof rather than the commander's cupola ring and its location
interferes with the hatches.
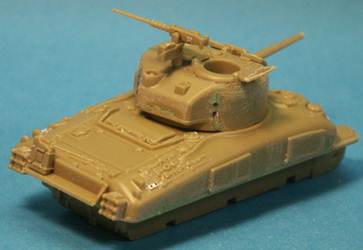
My almost "out of the box" M4A1 Sherman here is to be built
as a British Sherman II so a British storage box was stolen from an
Italeri M4A2 kit and glued to the turret bustle. The AA machine gun
has been moved to the commander's cupola ring. You'll notice that
the AA machine gun barrel has been replaced with a white plastic rod
after the kit barrel broke off. Sandskirts were more common with the
British Shermans.
 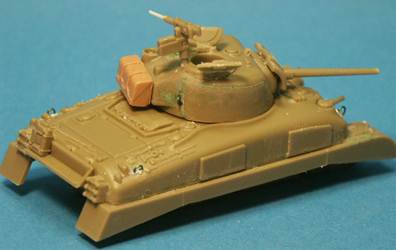
Lifting rings were made from copper wire. The turret pistol port has
been sanded down to represent a pistol port door welded shut. In this
view we see that the hull machine gun looks too thick; perhaps is
has a canvas cover on it.
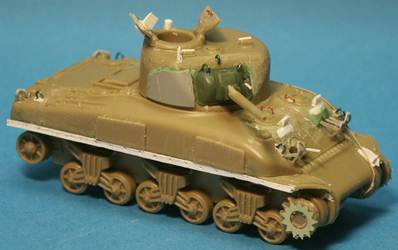
This series of photos covers my PSC M4A1(75) with some dressing up:
scratchbuilt detailing and parts stolen from other M4 kits. The turret
cheek armor and headlight guards are extras from Dragon kits. The
M34 rotor shield (gun mantlet) is from UM. A sandskirt bracket with
holes for bolts is from sheet styrene. A tow cable was fabricated
with a teabag string soaked in white glue.
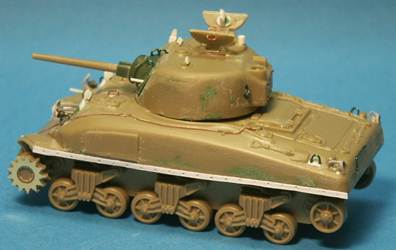
An etched brass
sprocket piece has been glued over the kit sprocket in an attempt
to make it look better: probably not worth the effort. From this view
we can see that this kit gives us a low-bustle Sherman turret. The
port-side pistol port has been completely scraped and sanded off the
turret side which was easier than detailing this hatch. For a short
while during production this pistol port (shell ejection port) was
either welded shut or completely deleted from the 75-mm gun turret.
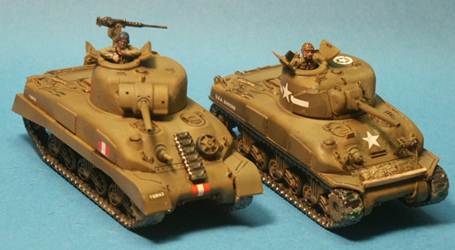
This photo shows the two Plastic Soldier Company M4A1(75) Shermans
painted in Model Master olive drab but no weathering other than a
pin wash in the recesses. The tracks are painted a dark gun metal
color pending a little dust weathering. Decals from the Italeri wargaming
M4A2 kits (British markings) at left and in US Army markings at right.
The figure in the British M4A1 (Sherman II) is the PSC kit tanker
figure; the US Army tanker at right is a white metal figure.
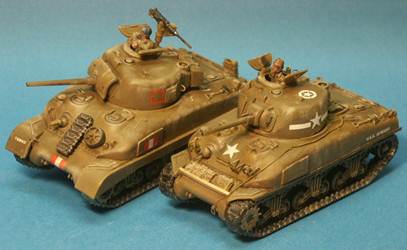
The British Sherman II, at left, has the spare 6-spoke roadwheel and
length of track run (both included in the kit) attached to the glacis.
Both kits have had the 75-mm M3 gun muzzles drilled out.
Both kits have been weathered with Tamiya Weathering Master which
is great for drybrush highlighting and looks essentially like woman’s
makeup with a sponge applicator. What bothers me a little is that
these kits come with the later one-piece wedge-shaped cast differential
housing rather than the earlier rounded or the three-piece bolted
housing.
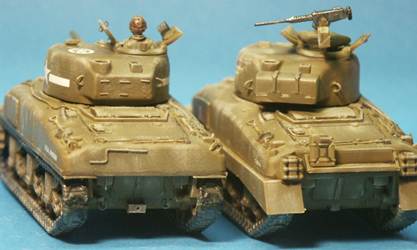
This rear view shows the features of the rear cast upper hull going
straight across where actually this version (the M4A1(75)) should
have a U-shape cutout on the rear; the only M4A1 that I have seen
that has this feature was the M4A1(76) with the T23 turret.
The US Army M4A1(75) at left has a towing pintle added, tow cable
and six lashing brackets on the turret bustle (alas, I did not notice
that one of these brackets had fallen off till paining was complete).
The Sherman II at right has the rear storage shelf (rack) with one
of the kit’s US Jerry cans magnetically attached. The odd blocky
things on each side of the storage shelf represent racks of three
spare track links
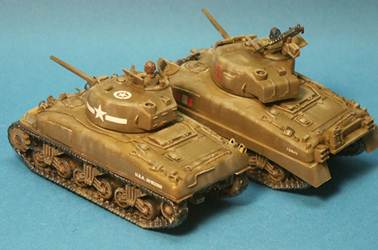
CONCLUSIONS
Despite its simplification of details and not really being 1/72 scale,
I like this kit. Fit of the parts was great, and the tracks are done
well; better than with Italeri's and Armourfast’s wargaming
Shermans. Best of all, the kit built quickly so I did not linger weeks
on the kit, detailing and assembling a hundred small parts. The contours
of the hull and turret look right, and it convincingly looks like
a Sherman. It will be difficult to win an AMPS or IPMS award with
it, but it is surpassing as a wargaming model.
References
- http://the.shadock.free.fr/sherman_minutia/sherman_types/m4a1.html
- SHERMAN MEDIUM TANK 1942-1945, by Steve Zaloga
& Peter Sarson, Osprey New Vanguard 3 (1993). ISBN 185532 296
X. A nice concise historical reference on the 75-mm gun armed M4
Medium tank.
- Sherman In Action, by Culver & Greer,
Squadron/Signal Publications ARMOR No. 16 [1977]. A good, inexpensive
softcover book in the noted book series geared to the modeler. Highly
recommended, but unfortunately completely leaves out coverage of
the M4A2 and M4A4.
|