Crusader Mk. III
Manufacturer: Revell 03125 (ex-Hasegawa)
By Marko Mäkinen.
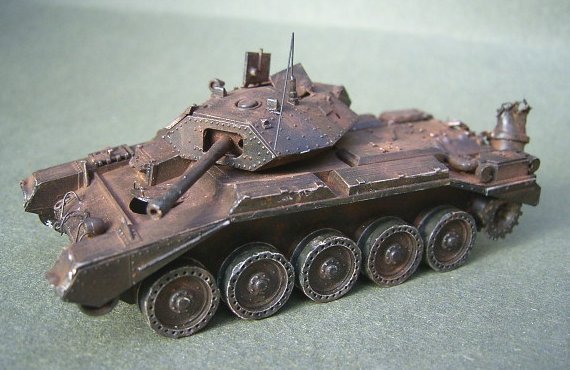
I have often felt that one of the weak points in my modelling is in finishing, especially in simulating various effects of wear and tear. It may be that I like the neat little thingies too much in their out-of-the-box condition to deliberately damage and batter them. However, realizing the sense of life these kind of treatments may give to the model, I wanted to practice my skills in this area. So I decided to dedicate one kit completely to different aging and damaging tests. Normally I model mostly German WW II vehicles, but this time I did not let this limit the choosing of the subject. What I wanted was a nicely detailed kit from the WWII era, that would be easy to build and cheap to purchase. As such I picked up the Crusader Mk III by Revell (formerly Hasegawa). There would have been some other interesting choices in the same price range, too, but the Crusader appeared to be a very suitable model for this kind of purpose. Some of the kits structural solutions put certain limits to the process, however, and for instance the solidly molded inner road wheels prevented any "collapsed spring" experiments. I wanted the model to be somewhat consistent and story-telling in its finished state, not a collection of random bents, bumps, shell penetrations and the like. Hence the model tries to represent a vehicle, which has been in hard active use, then suffered a destructing hit and finally left to the mercies of weather and scavengers. To achieve this I did the following.
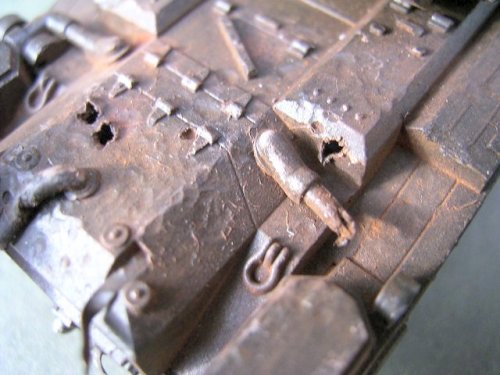
 I built the chassis
normally. I then applied some dents and holes with a
motor tool to the engine deck and tool boxes, which in
reality are made of rather thin material. To achieve a
more realistic look, the plastic was thinned to a near
scale thickness on the inner side of the parts in
question before assembly. By doing this I tried to
illustrate that the spare fuel tank on the aft has
exploded and damaged the rear of the vehicle. The
Crusader used gasoline as fuel, and in the desert heat
partly vaporized contents of the tank have blown up by a
hit of a red-hot shell splinter. The vehicle has not
sufferd fire, thus no burn marks are made.
I built the chassis
normally. I then applied some dents and holes with a
motor tool to the engine deck and tool boxes, which in
reality are made of rather thin material. To achieve a
more realistic look, the plastic was thinned to a near
scale thickness on the inner side of the parts in
question before assembly. By doing this I tried to
illustrate that the spare fuel tank on the aft has
exploded and damaged the rear of the vehicle. The
Crusader used gasoline as fuel, and in the desert heat
partly vaporized contents of the tank have blown up by a
hit of a red-hot shell splinter. The vehicle has not
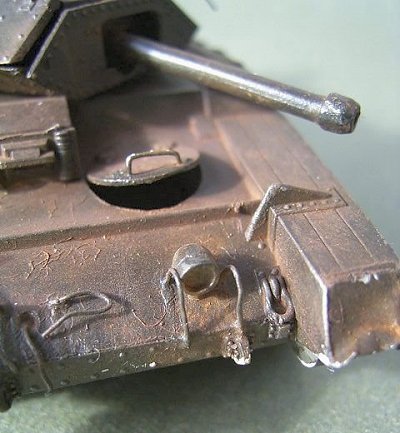
sufferd fire, thus no burn marks are made.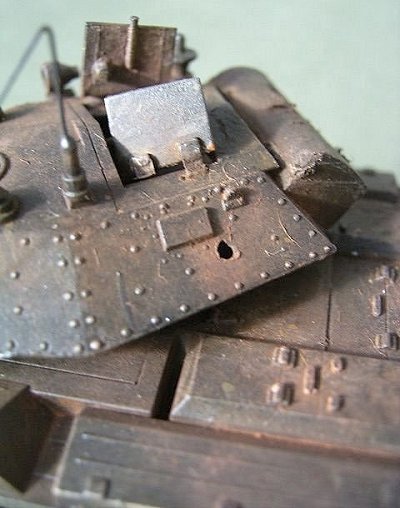 I put together the turret,
drilled an anti-tank shell penetration hole (approx. 75
mm calibre) on the left side and simulated the effect of
the shock by opening up the seams on the opposite side of
the turret, breaking the front armor plate and tilting
the main gun to a distorted position. The riveted
structure of the turret would have offered a nice,
further test bed for experiments with popped out rivets
and empty rivet holes, but this would have required a
much smaller drill bit (and patience) than I had.
I put together the turret,
drilled an anti-tank shell penetration hole (approx. 75
mm calibre) on the left side and simulated the effect of
the shock by opening up the seams on the opposite side of
the turret, breaking the front armor plate and tilting
the main gun to a distorted position. The riveted
structure of the turret would have offered a nice,
further test bed for experiments with popped out rivets
and empty rivet holes, but this would have required a
much smaller drill bit (and patience) than I had.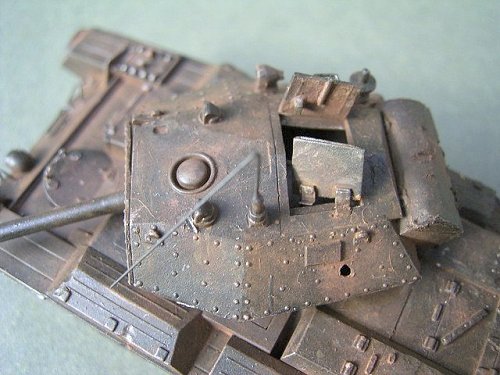 I attached all hatches in
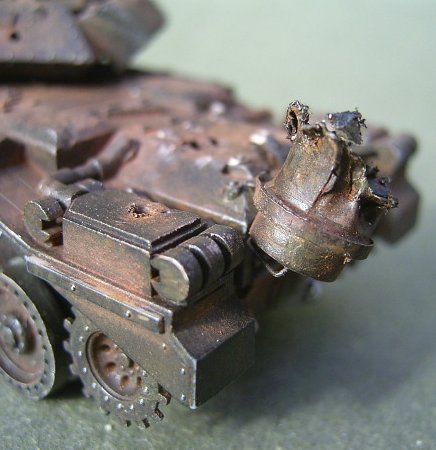
open or semi-open position to indicate an internal
explosion in the turret and evacuation of the rest of the
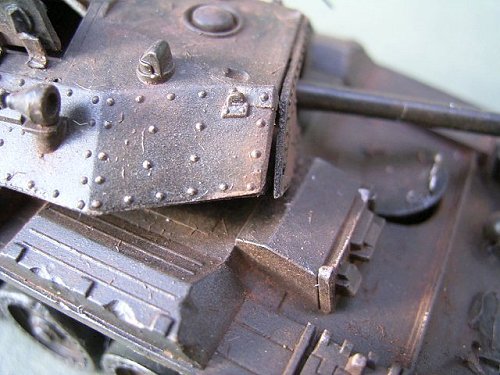
crew from the hull compartment. I also built the remains
of the external fuel tank using metal foil and metals
strips, and attached them in a manner as if the tank had
been torn up and bent sideways in the explosion. I also
replaced the fuel hose and the other exhaust pipe with
sections of electric cord cover, cutting and mangling
them. The antenna mast was installed in a bent and fallen
position.
I attached all hatches in
open or semi-open position to indicate an internal
explosion in the turret and evacuation of the rest of the
crew from the hull compartment. I also built the remains
of the external fuel tank using metal foil and metals
strips, and attached them in a manner as if the tank had
been torn up and bent sideways in the explosion. I also
replaced the fuel hose and the other exhaust pipe with
sections of electric cord cover, cutting and mangling
them. The antenna mast was installed in a bent and fallen
position.Voilá! The effort may not be completely satisfying, being partly overdone, partly perhaps under-done, but the benefits of the project for me personally were just what I wanted. I feel more secure to try different methods of aging and damaging with other model projects after this experiment. I believe this will be a welcome improvement in my modelling. A big thank you to Ilian Filipov for inspiration and assistance in the preparation phase of this modelling project.
![]()
| Back to Revell Kit List | Back to Home Page |
| Back to Hasegawa Kit List | Back to Kit Reviews |