Pz.Kpfw. VI Tiger Ausf. H
Manufacturer: Revell AG.
(Kit No. 03108)
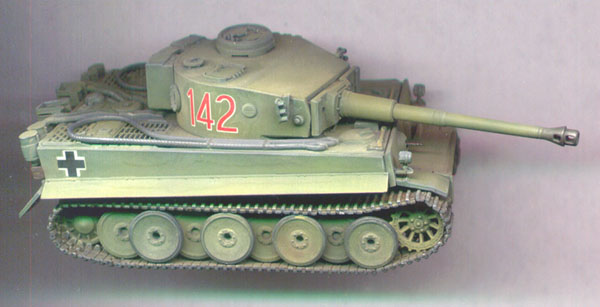
I learned a lot about
Tiger tanks while building this kit. Prior to construction, I had
absolutely no reference material on the Tiger, and I now have
quite a bit. First of all, the name: What is an Ausf.H? According
to T. Jentz in Osprey's New Vanguard book on the Tiger I, when
the Tigers first entered production, the name was Ausf.H. In
March, 1943, the name was changed to Ausf.E. There were no
specific changes in the vehicle that corresponded to the name
change, as many changes were introduced throughout the production
of the Tiger. Before March, 1943, Tigers were officially called
Ausf.H, and after March, they were all called Ausf.E. This kit
represents one of the earliest production models of the vehicle,
hence the name.
What I consider to be the
main drawback to this kit, is that it allows you to build only
the earliest version of the Tiger, that being the version in use
by the 501st Heavy Panzer Battalion in Tunisia during 1942 and
early 1943 (with some very minor alterations, you can also build
the first Tiger that went into combat, from the 502nd Heavy
Panzer Battalion at Leningrad). The kit comes with many optional
parts, and the instructions even show where all these optional
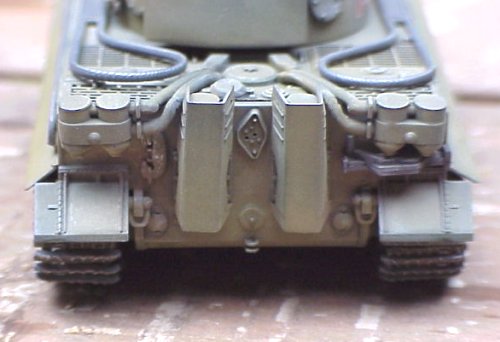
parts were to go, but the limiting factors are the square muffler
shields, and the SMG port on the right rear turret wall. The
square-style muffler shields were used only by the 501st and
nobody else. Also, the right-side SMG port was replaced by an
escape hatch at the end of December 1942, so some of the other
optional parts included in the kit cannot be used, because they
were introduced after the escape hatch (which is not an option
included in this kit). Specifically, the loader's periscope on
the turret roof (part no.40), and the spare track links on the
turret side. None of these parts should be added, because they
were not seen on Tigers used by the 501st. Unfortunately, I
didn't realise this until after I built my kit, and I
inadvertently added the spare track links. Some day, I will go
back and remove them.
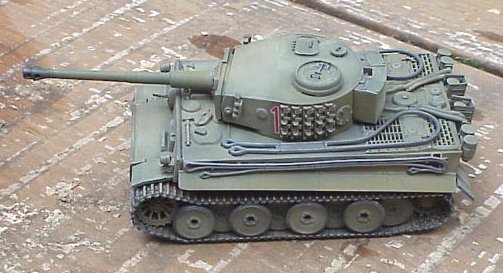
With the understanding
that this kit can produce only an accurate vehicle from the 501st
Heavy Panzer Battalion (or earlier), it is time for me to say
that it is an outstanding kit, and builds into a remarkable
replica of a 501st Tiger. There is no decent alternative on the
market today for an accurate Tiger I. See my Tiger Comparison article for further comments on
this kit, compared to the Hasegawa Tiger.
Strengths of the kit:
- The engine deck
grills are molded all the way through the hull.
- All of the
appropriate details specific to the 501st Heavy Panzer
Battalion are included, such as the narrow front
mudguards, the square-style muffler shields, the option
to attach the headlights to the front of the hull, and
the overly-large balkenkreuzes.
- The overall level of
detail is outstanding. All of the hinges, bolts, tools
and hatches are molded in excellent relief that just begs
for a good wash and drybrushing.
- The turret shape has
the correct enlargement of the left side of the turret
(the gun is mounted in the dead center of the turret,
down the centerline of the tank).
- The link-and-length
style tracks are, by far, the nicest injection molded
tracks I have seen on a 1/72 scale tank.
- The commander's hatch
is detailed on the inside too, in case you want to add a
commander figure in the open hatch (figure not included
in the kit).
- The floor of the hull
side sponsons that are above the wheels and tracks have
the correct concave shape to them. Not flat as in the
Hasegawa kits.
- The hull MG is the
most delicate and "scale-accurate"
representation of an MG-34 that I have ever seen.
- Ease of construction.
Overall, the assembly was incredibly simple, with almost
no hassles (a couple noted below).
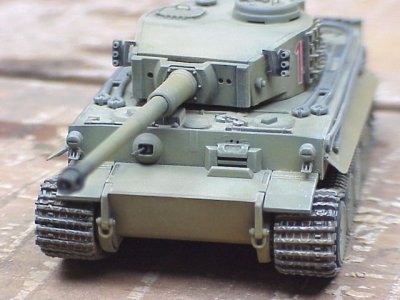
Weaknesses of the kit:
- Only the commander's
hatch is molded open. The loader's, driver's and radio
operator's hatches are all molded shut.
- The pioneer tools are
molded onto the hull. I prefer the option of attaching
these tools only if I want to. Not all Tigers had a
shovel attached to the hull underneath the cannon barrel,
for example.
- The heat shields
around the mufflers were a very tight fit, and had to be
slightly bent to get them to fit between the mufflers and
the feifel air filters (in fairness to Revell, photos
show that this was also the case in real life, but maybe
not to the extent required by the kit).
- The smoke grenade
launchers on the turret could have been shaped a little
better.
- The holes for the
spare track links on the turret side need to be filled
(they are very large holes).
- It was not easy
fitting the track links on the tops of the wheels,
because of the overhanging hull sponsons. Revell did
better with their Panthers, where they gave the builder
the option of building the entire wheel and track
assemblies separate before attaching them to the hull.
- The apertures for the
driver's periscope are missing from above the visor on
the hull front. This is an easy fix with a fine drill
bit.
- The balkenkreuzes are
printed out of register on my decal sheet, which seems to
be a chronic problem for small scale armor manufacturers.
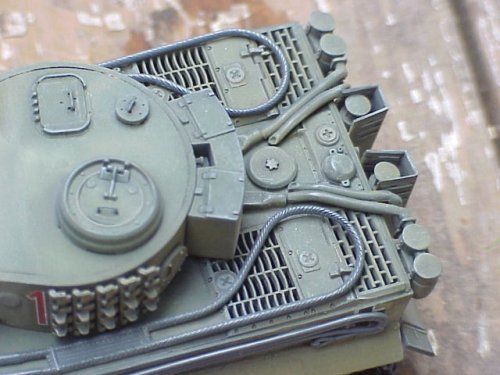
Additional Notes:
- The kit includes the
option to leave off the outer-most wheel of the first
pair of bogies, and replacing it with a simple hubcap.
The only photos I have ever seen of this were some
pictures of Tigers in a training exercise. That could
make a neat diorama.
- I think that the tow
cables are far too stiff and heavy to use. I used mine,
not realising this, but if I were to build another one,
I'd replace them with some real wire or thread, so as to
make them better conform to the surface of the hull.
- I replaced the hatch
handles for the two turret hatches with bent wire. I also
added a handle to the exhaust fan cover on the turret
roof (part no.41), because I've seen some photos that
show a handle on this piece on some vehicles.
- It is very important
to continuously dry-fit the track links as you are
attaching them. If you use superglue like I do, any
miscalculation will result in either a gap, or bunched-up
track (see photo above).
- The mudguards on the
hull sides are blanked off at the front and rear. Some
Tigers had plain sheetmetal guards, with no blanking at
the ends. I clipped off the corners, and thinned the
edges with sandpaper to better simulate the sheet metal.
Painting: There is still
some controversy over the colors used on Tunisian Tigers. Were
they gray? Tan? Green? I chose to follow the thoughts of Tom
Jentz, and I painted mine with a base color of Panzer Grey. I
then added a lightened "pea green" overcoat, to
represent a field application which didn't completely cover the
gray. And finally, I added considerable amounts of dust, which
gives it a very tan appearance.
In conclusion, this is an
absolutely superb kit. I had a few minor issues with it, but what
kit is perfect? All in all, an excellent job again, Revell!
(special thanks to Jim
Matthiessen for contributing much to the kit accuracy research)
Postscript: I recently browsed through Jean
Restayn's book Tigers on the Western Front,
and according to this book, the turret numbers for this vehicle
should be only white outlines, and no red fill. Oh well.

