Trumpeter has released
the range of Stug III “Ausf’s” from B to G. This
preview is for the Ausf. C/D. (Externally the C and D versions are
the same). (A Table of how to make all the different Ausf.’s
is included at the end of this article). Some of the sprues will
be the same across the range, like the double set of A sprues with
the wheels, sprockets & idlers, etc.
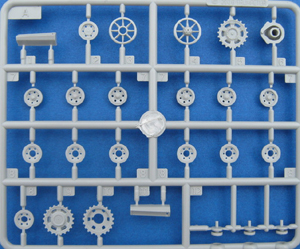
The wheels are nicely done with good details around the holes etc,
the only parts that look odd are the sharp edged tyres which just
need a blade skimmed along the edges to round them back a little.
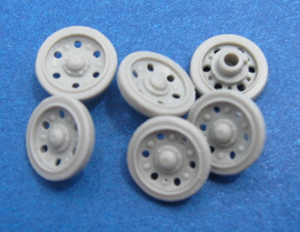
Here are all the outer wheels with the tyres ‘skimmed’
back along the edges.
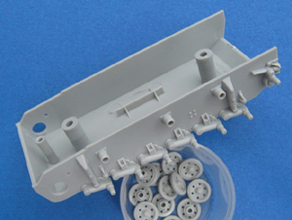 
The lower hull has pre-made screw pillars inside and has the axles
moulded correctly off-set on each side.
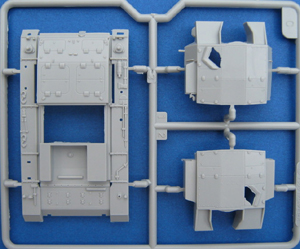
Sprue C has the main problem
with this kit, the upper hull is the later style with the smaller
hinges that came out for the Ausf E. You have two options here:
1. Shave off the little hinges & remake them with the bigger
ones (or buy a Stug III Ausf. B kit which has the correct upper
hull with correct larger hinges).
2. Use the spare Ausf. E superstructure which is included with this
kit, instead of the Ausf. C/D one and make a Ausf. E kit OOTB.
Also, neither superstruture has any hatches open, so you will have
to cut them open & scratch new doors from plastic sheet, if
you want them in this position.
As the hatches are very plain this will not be a hard job.
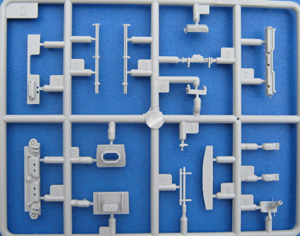
Sprue D carries all the other details like the gun barrel in three
parts, exhaust (which has four large holes that need to be filled
and re-drilled with smaller holes) aerial rails (2 included, 1 needed
for a C/D kit).
The gun cleaning rods are all in
one piece on their bracket and the rods themselves are a little
mis-moulded and would be hard to clean up. It’s probably easier
to replace the rods with stretched sprue.
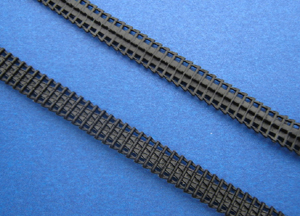
The tracks are nicely done but are in the black vinyl not liked
by modellers who prefer to paint their tracks first or use acrylics.
(I glued them first with superglue and then sprayed them with enamel,
which gave good results).
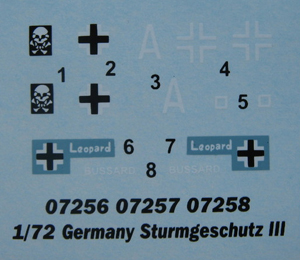
The decals are the same through all the kits from Ausf. B to E :

1. Is for Abt. 192 (pictures show they used Ausf. B and C/D’s).
The only trouble is the Stugs had the unit symbol on both sides,
front & rear but you are only supplied with two on the decal
sheet.
3,4,5 are for an Ausf. B (again four decals of no.5 are needed).
6,7. ‘Leopard’ is an Ausf. E and
2,8. ‘ Bussard’ is an Ausf B.
Trumpeter Sturmgeschütz
III Table
| Ausf. |
Short gunned
Stug III’s |
A |
Use Ausf. B Kit, move front
return roller back to the same distance as the second and third
return roller, swap later ‘D hole’ sprocket with
a earlier ‘o’ hole sprocket (a pair can be spared
in the early DML Nashorn). |
B |
Can be built OOTB (Ausf. B’s
used both early & then late sprockets and rear idlers).
|
| C/D |
Needs larger Ausf. A or B hinges
for the front upper hull. Only needs one aerial rail. |
E |
Can be built OOTB from either
the C/D or E kit. |
Pro’s
A very good range to have, especially since they started with early
war Ausf.’s which have not been popular with manufacturers
so far. Nice, fine details.
Con’s
Closed hatches, vinyl tracks,
missing small details like lift hooks, lamp guards etc. Wrong hinges
for the C/D version.
Conclusion
Useful range, well detailed, recommended.
Good References
- Sturmgeschütz III in action. Armor
No. 14, by Bruce Culver, Squadron/Signal Publications.
- Assault Gun III: Backbone of
the German Infantry, Volume I / StuG III, Vol. I & II, History
Facts, http://www.historyfacts.biz
- Panzer Colours III by Bruce Culver, Squadron/Signal
Publications.
- Encyclopedia of German Tanks of WWII by
Chamberlain/Doyle, Arms and Armour.
- A Web reference Army Group North Miniatures
http://www.agnminiatures.com/html/stug_iii_c_d.html
|

