|
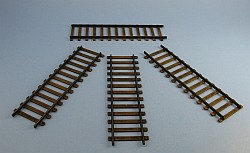
Kit contains 4 tracks molded in black plastic on one sprue. Packaging consists of a plastic bag with a thin cardboard header. Instructions and painting guide
are on the reverse side of the header. These are basically the same track sections as comes with their Draisine kits. The sections are designed to butt one to the other
to make a longer piece if desired though I would suspect that the join should have a bolted fish-plate attached accross the joint at the point they touch as
opposed to just simply placing them end-to-end.
The undersides of the ties have some sink holes but this is of no consequence as no one will see them anyway.
The upper sides have nice detailing with the base plates and their spike heads molded directly to the ties. There is some wood grain relief on
the ties but only for the portion between the rails.
There is no wood grain present on the outside of the rails which will need to be added by the modeller.
A few of the ties also sport ejector pin marks. Depending upon your preferences they may require filling or scraping (which will undoubtably
remove the molded wood grain),
while leaving them in place will add some character to the ties. I just lightly scraped the marks with an Exacto blade to
reduce their visibility somewhat and then dragged my hobby saw along the tops of the ties a few times to add wood grain effect. I then used my knife to
scribe some wood grain into the part of the ties outside of the rails. I applied a thin layer of liquid glue overtop to reduce the ridges in the
plastic left by the scrapings.
Kit
Measurements | Corresponding 1/72
scale dimensions |
The most important measurement listed to the left is the guage. I checked
the specifications for Soviet/Russian railroads on
the Wikipedia which lists the guage at 1.50m. In 1/72 scale this calculates to 20.83mm making the tracks a little oversize for 1/72 scale but close enough for this hombre.

|
Track Length
104mm | 7.488m |
Tie width
30mm | 2.16m |
Track Guage
21mm | 1.512m |
Painting is a snap. First a coat of Testors Light Grey as a primer, followed by a coat of Testors RAF Dark Earth to the ties. I didn't worry about
any overspray to the rails. A coat of Testors Glosscote was followed with a wash of Testors Flat Black over the ties. I then mount the track sections to lengths of masking tape pinned
to a piece of cardboard, masked off the ties (no need to get too neat here either)leaving the rails exposed
and sprayed the rails with Krylon Gloss Black. Off came the masking covering the rails and then run some thin strips of masking tape along the top of the rails and then drybrushed with Aeroamaster Light Earth.
While the masking tape is still in place I spray the track sections with Aeromaster Acrylic Flat, then removed the tape and then added some gleam to the tops of the rails by running
pencil lead over the top of the rails. There, done and without too much fuss!
Not a bad offering from UM and one that is definitely nice to have as an option should the modeller need some rail sections for a
diorama or displaying railroad vehicles that didn't come with rails in the package.
|